
3 Creative Ways to Dye Easter Eggs

Happy spring! 
In this post I share a few creative ways to dye Easter eggs!


Try Homemade Natural Dyes

For the last couple years my kids and I have experimented with making homemade natural Easter egg dyes. So far our best results have come from red cabbage and yellow onion skins. Red cabbage makes beautiful blue eggs and yellow onion skins make orange.

To make your dyes you'll need about a cup of red cabbage and a cup of yellow onion skins. Boil a small pot of water for each color. You'll want 2-3 cups of water per pot. Add your plant matter and reduce heat to low. Cover each pot with a lid and let them simmer for about 20-30 minutes.

Let your dyes cool, then strain out the plant matter. Add your dyes to a few glass mason jars and add a hard boiled egg to each jar. Put on the lids and stick in your fridge. Leave the eggs in the dye for an hour or two for lighter shades and overnight for deeper shades.


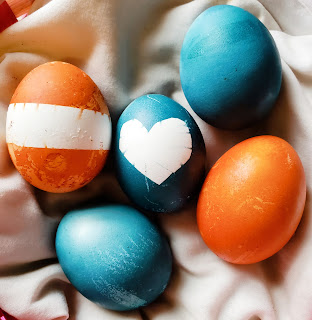
To make hearts and stripes like the eggs in the photo, cut pieces tape and stick them to the eggs before putting them in the dye. I personally like using electrical tape because it's fairly waterproof and peels off easily. Peel the tape off after the eggs have been removed from the dye and have fully dried. 


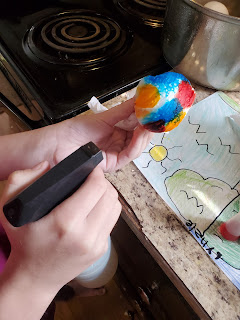
Make Tie Dyed Eggs with Paper Towels

These turn out really cool, but can be a bit messy so wear a smock or old clothes and maybe some rubber gloves. You'll want something to protect your work surface too, like newspaper or a cheap plastic tablecloth. 

To make these eggs you will need:
-hard boiled eggs
-paper towels
-rubber bands
-food coloring
-a spray bottle full of water

Place a hard boiled egg in the center of a paper towel square. Wrap the towel up around the egg and secure in place with a rubber band. 


Drop drops of food coloring onto the paper towel. Use different colors and put drops all over egg. You want the egg pretty evenly covered with spots, but try to keep the spots from overlapping.


Spray gently with a spray bottle of water. You want the paper towel to be damp but not soaked.


Set aside in an old egg container until the paper towels are dry. Then unwrap your eggs.


Flower Print Eggs

You can make these cool flower print eggs with any kind of dye. To make them you will need:
-hard boiled eggs
-egg dye
-a pair of nylons
-rubber bands
-fresh flowers and leaves

Start by cutting the pair of nylons into some pieces. They just need to be big enough to wrap around an egg and be held in place with a rubber band.

Choose a flower or leaf. Place it on a hard boiled egg. Carefully wrap the egg with a piece of nylon, securing the flower in place. Use a rubber band to hold the piece of nylon in place.

Set the egg in a cup of dye for the desired amount of time. Remove the egg from the dye and let the excess dye drip off. Then set it aside until it is dry or at least almost dry. Unwrap the egg and peel off the leaf or flower. 


If you enjoyed this post check out:


Follow me on

Comments

Popular posts from this blog

Water Relay Races For Kids

I don't know about your kids, but mine absolutely love games involving water and getting wet in the summer time. In  this post I share 5 of our favorite water relay races to play with friends. These are perfect for birthday parties, homeschool get togethers, and other group events. Sponge Relay: For this relay you will need: - 2 teams of several kids each -2 large sponges -4 small buckets or containers of some sort Divide your participants into 2 teams and have each team line up single file at a predetermined starting place.  Hand out a sponge to the first participant in each line. Set a bucket of water by each team. Set an empty bucket about 20 ft away from each team.  The two empty buckets should be the same size and should have a "fill line" marked half way up. On a count of 3 (or ready set go) the first participant in each line should dip their sponge in the bucket of water, run to the empty bucket, squeeze the water from their spo

Make Your Own Mineral Identification Kit

One of my family's favorite hobbies is rock hounding. We love collecting and trying to identify neat rock and mineral specimens that we come across. You can put together your own simple kit for identifying rocks and minerals with materials you likely already have around your home. In this post I will explain how to put together your own mineral identification kit and how to use it to identify rocks and minerals you find on your adventures. Making a Rock and Mineral ID Kit Grab yourself a printable Rock and Mineral Journal for recording your observations here:  Printable Rock and Mineral Journal ,  and then gather the following supplies: -A pencil -A coin -An iron nail -A piece of glass (an old pocket mirror works well) -A ceramic tile -A small watertight bottle or container -Some vinegar -A magnet  -A magnifying glass -A dropper (optional)  -Rock and mineral guide (optional)  -A small container or bag to keep it all in Fill the small watertight

STEM Art: 21 STEAM Project Ideas

My kids love STEM projects and we're always looking for ways to add more art to our homeschool days, so I decided I am going to try to dedicate one morning a week this year to STEM art activities. In this post I share some of the ideas we're planning to try, plus a few favorites we've done in the past. What is STEM Education? STEM education is a blended and often hands on approach to teaching science, technology, engineering, and mathematics, which are some of today's fastest growing industries. STEM education offers students the opportunity to problem solve and work on real world problems and questions. Sometimes the acronym STEAM is used, to include the arts. Adding art to STEM education encourages creative thinking and problem solving skills. It can also help make the other included subjects more appealing to some students. STEM Art Projects  Penny Spinners-   Learn about centrifugal force and make your own spinning tops with this fun post from Teach Beside Me. Explo

40 Things To Look At Under A Microscope

Microscopes are a scientific instrument that all kids should get a chance to learn how to use. There are so many everyday things that look really amazing up-close. Under a microscope you can see that objects and even plants and animals are made of tiny intricate parts. The microscopic world is amazing! In this post I share 40 things to try looking at up-close under a microscope. 40 Things To Look At Under A Microscope: 1. A feather  2. Soil 3. An insect wing 4. A human hair 5. An animal hair 6. Pond water 7. Diatomacious earth-  diatomacious earth looks SO cool magnified! 8. Cheek swab 9. An insect leg 10. A drop of blood 11. Mold 12. Sand 13. A shaving from a chicken bone- try both a piece of hard bone from the outside and some spongy bone from inside a bone. 14. Kombucha 15. Snake or lizard skin after they shed  16. A flower petal 17. A sliver of wood 18. Sugar 19. Salt- try different types 20. Thread 21. Saliva 22. A s

Learning About The Human Body Part 1: The Skeletal And Muscular Systems

At the end of each school year, I sit down with my daughter to discuss what topics she wants to learn about the next year. One of her science topics she picked to study this year was the human body. Instead of ordering a boxed curriculum set, I decided to put together my own human body unit. In this post I share some of the resources we used for learning about the human skeletal and muscular systems, plus instructions for a couple hands on learning activities. You can find my post about the human respiratory and circulatory systems  here , and my post about the human digestive and nervous systems  here . The Human Skeletal System Our skeletons are the frame of our body. They give us structure, without them our bodies would be limp like noodles. They also provide places for muscles to attach so our bodies can move. Why Does Your Body Need Calcium? Experiment: This is a simple experiment you can do to explore why calcium is important for our bones. You will need: -several clean